Easy Origami Sofa: Step-by-Step Paper Craft
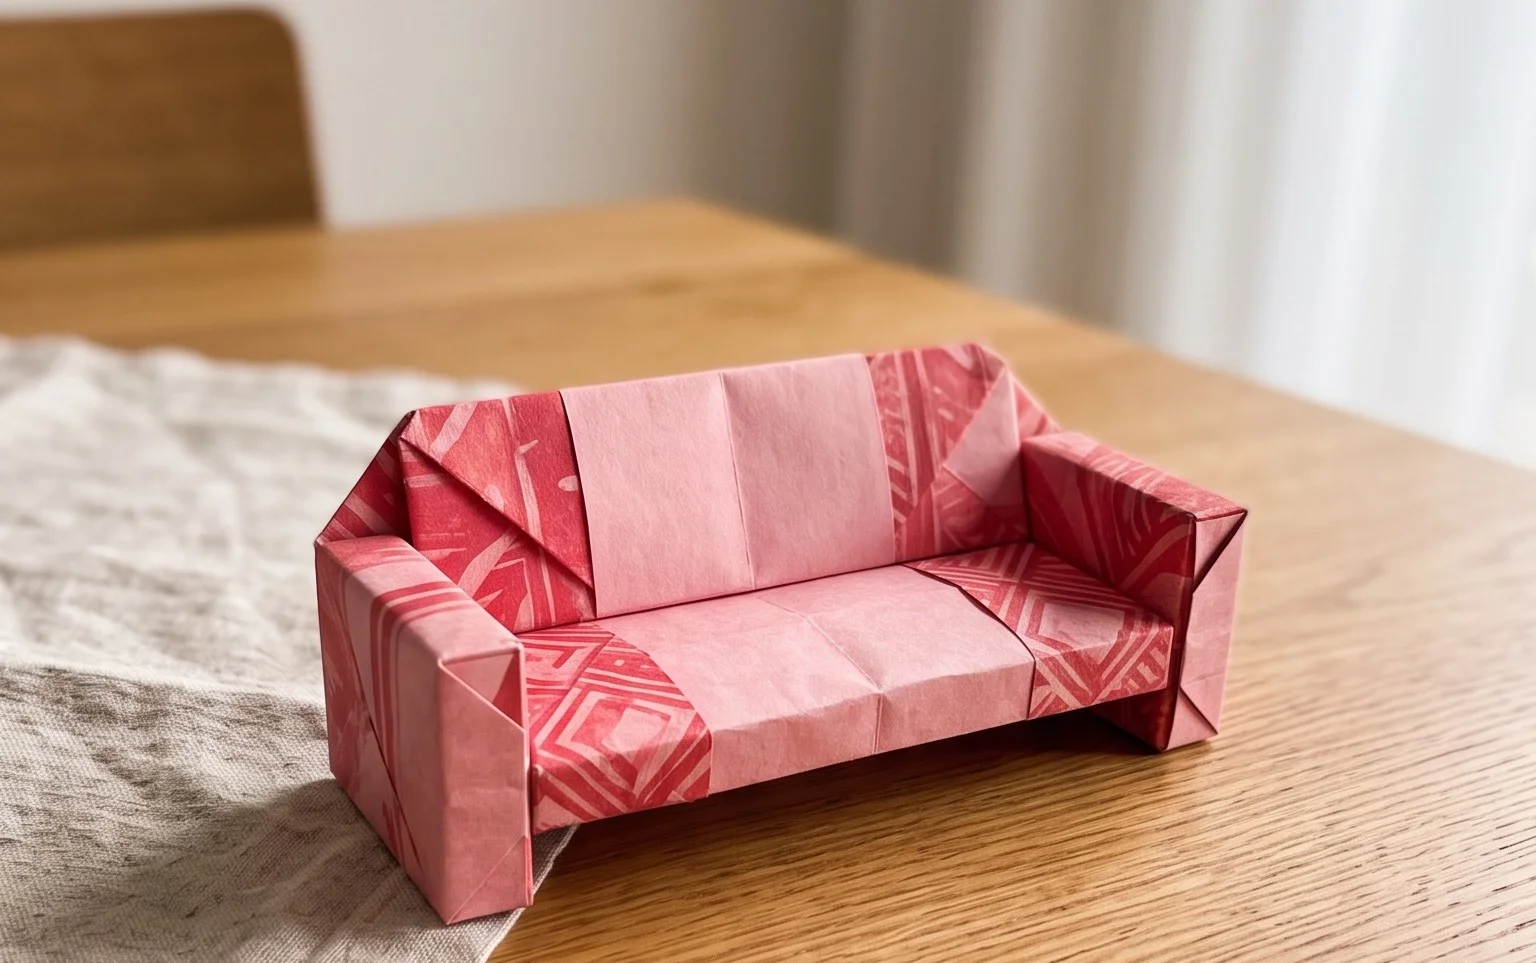
How to Fold an Origami Sofa is a delightful project that’s perfect for bringing a touch of cozy charm to your desk or a miniature scene. Imagine a perfectly proportioned, little sofa, complete with a supportive backrest and comfortable-looking seat, all crafted from a single sheet of paper! This is a fantastic project for complete beginners and older kids alike, taking about 10-15 minutes to complete once you get the hang of it. It makes for a lovely handmade gift or a cute decoration for any room. In this tutorial, we’ll guide you through each simple fold, step by step, so you can easily create your very own paper sofa. Let’s get folding and build some miniature furniture!
How to Fold an Adorable Origami Sofa
Hello, origami enthusiasts! Today, we’re going to embark on a delightful journey to create a charming little origami sofa. This is a fantastic project for beginners and experienced folders alike, offering a satisfying result that’s surprisingly easy to achieve. So, grab your paper, take a deep breath, and let’s get folding!
Choosing Your Paper: The Foundation of a Great Sofa
The paper you choose will significantly impact the look and feel of your origami sofa. For this project, I recommend starting with standard origami paper.
* **Type:** Origami paper is ideal because it’s thin, crisp, and holds creases very well. Regular printer paper can be too thick and won’t produce as sharp or clean folds. If you can’t find dedicated origami paper, a thin, high-quality drawing paper or even some types of wrapping paper might work, but origami paper is definitely the easiest to work with.
* **Weight:** Origami paper typically comes in weights around 60-90 gsm (grams per square meter). This weight is perfect for achieving neat folds without the paper becoming too bulky.
* **Size:** For a beginner-friendly size, I suggest starting with squares of 15cm x 15cm (6 inches x 6 inches). This size is manageable and allows you to see your folds clearly. You can certainly use larger or smaller squares later on to create different-sized sofas.
* **Single or Double-Sided:** For this particular model, using single-sided origami paper (one coloured side, one white side) is perfectly fine and can even add a subtle two-tone effect to your sofa, particularly on the underside. However, if you have double-sided origami paper, it will also look wonderful, giving your sofa a consistent colour throughout. Ultimately, the choice is yours and depends on the aesthetic you’re aiming for!
Laying the Groundwork: Essential Base Folds
Before we dive into the specific sofa folds, let’s make sure we’re comfortable with a couple of fundamental origami techniques. These are the building blocks for many origami models, and mastering them will make this sofa, and many other projects, much easier.
The first crucial fold is creating a precise crease down the center of your square.
1. **The Half Fold:** Start with your square of paper. If you’re using single-sided paper, place it on your work surface with the coloured side facing down and the white side facing up. Take the bottom edge of the paper and bring it up to meet the top edge perfectly. Align the corners carefully. Once the edges are perfectly aligned, run your finger firmly along the folded edge to create a sharp crease. Then, unfold the paper. You should now have a horizontal crease running across the middle of your square.
Next, we’ll create a vertical crease.
2. **The Other Half Fold:** Now, turn your paper 90 degrees so it looks like a diamond in front of you. Take the left edge of the paper and bring it across to meet the right edge. Again, align the edges as precisely as possible. Run your finger along the folded edge to create a sharp crease. Unfold the paper. You will now have a vertical crease running down the center of your square.
At this point, you should have a square with two perpendicular creases, dividing it into four equal smaller squares. These creases are essential for guiding our subsequent folds.
The Folding Sequence: Building Your Origami Sofa, Step-by-Step
Now that we have our base creases, let’s transform our square into a cozy origami sofa!
1. **Prepare the Paper:** Start with your square of paper placed on your work surface. If you are using single-sided paper, place it with the coloured side facing up and the white side facing down. You should have your horizontal and vertical creases visible.
2. **Fold the Bottom Edge Up:** Take the bottom edge of the paper and fold it upwards so that it meets the horizontal crease that runs across the middle of the paper. Align the bottom edge perfectly with the center crease. Make a firm crease along this new fold.
3. **Fold the Top Edge Down:** Now, take the top edge of the paper and fold it downwards so that it also meets the horizontal crease that runs across the middle of the paper. Align this top edge perfectly with the center crease. Make another firm crease along this fold. Your paper should now have two horizontal creases dividing it into three equal sections, with the middle section being the original horizontal crease.
4. **Open the Sides Inwards:** Look at the two vertical creases you made at the beginning. We’re going to use these. Take the left edge of the paper and fold it inwards so that it meets the vertical crease that runs down the center. Align the left edge precisely with the center crease. Make a firm crease.
5. **Repeat on the Right Side:** Now, take the right edge of the paper and fold it inwards so that it also meets the vertical crease that runs down the center. Align the right edge precisely with the center crease. Make a firm crease. Your paper should now be narrower, looking like a long, rectangular shape with the original horizontal and vertical creases still visible.
6. **Flip the Paper Over:** Carefully turn your entire folded piece over so the back side is now facing up.
7. **Fold the Bottom Edge Up Again:** Take the bottom edge of this new shape and fold it upwards so that it meets the horizontal crease that is now near the top of your folded piece. Align this bottom edge perfectly with that horizontal crease. Make a firm crease.
8. **Fold the Top Edge Down Again:** Now, take the top edge of your paper and fold it downwards so that it also meets the same horizontal crease you just folded to. Align this top edge perfectly. Make a firm crease. You’ve essentially folded the sides in again, creating a more compact shape.
9. **Create the “Back” of the Sofa:** Locate the vertical crease that runs down the center of your current shape. Take the entire right half of this shape and fold it upwards, away from you, along that vertical center crease. You are folding it so the point where the two horizontal folds from step 7 and 8 meet now becomes the top edge. Make a very firm crease.
10. **Shape the “Armrests”:** Now, look at the part you just folded up. On the right side, you should see a triangular flap. We need to create the armrest. Take the outer edge of this right flap and fold it outwards at an angle. Imagine you’re creating the side of a sofa. The angle should be roughly 45 degrees, so it angles out and down. You want to create a “ledge” for the armrest. Make a firm crease.
11. **Repeat for the Other Armrest:** Now, turn your model over. You’ll see a similar flap on the other side. Take the outer edge of this left flap and fold it outwards at the same angle as the first armrest. Aim for symmetry. Make a firm crease.
12. **The Final Touches:** Gently pull the two “armrest” flaps outwards slightly to give your sofa a more rounded and defined shape. You can also gently shape the “back” of the sofa by slightly pulling the folded-up section backwards.
Congratulations! You have now folded your very own origami sofa!
Common Pitfalls and How to Avoid Them
Even with clear instructions, beginners can sometimes stumble. Here are a couple of places where things often go wrong and how to prevent those frustrating moments.
* **Messy Creases:** This is perhaps the most common issue for beginners. Origami relies on sharp, clean creases to make subsequent folds accurate.
* **How to Avoid:** When you make a fold, don’t just press lightly with your finger. Use the tip of your fingernail or even a bone folder (if you have one) to really flatten the crease. Ensure the edges and corners you are aligning are perfectly matched *before* you make the crease. Take your time with each fold and make sure it’s as precise as possible.
* **Misaligning Edges and Corners:** If your initial folds aren’t precise, the rest of the model will be out of whack.
* **How to Avoid:** Before you crease, hold the edges you’re bringing together firmly and ensure they are perfectly aligned. For example, when folding the bottom edge to the top edge, make sure the corners on both sides meet exactly. Don’t rush this step. A slight misalignment at the beginning can lead to significant problems later on. Pay special attention to the very first half folds, as they set the stage for everything else.
Making It Your Own: Variations to Explore
The beauty of origami is its endless potential for customization. Once you’ve mastered the basic sofa, here are some ways you can personalize your creations:
* **Size:** As mentioned, simply start with a larger or smaller square of paper. A 20cm x 20cm square will give you a bigger sofa, while a 10cm x 10cm square will yield a miniature version.
* **Paper Pattern:** This is where you can really have fun!
* **Patterned Origami Paper:** There are countless beautiful origami papers with all sorts of patterns – floral, geometric, abstract, even novelty prints. Choose patterns that complement the idea of a cozy sofa.
* **Scrapbooking Paper:** Thinner patterned scrapbooking papers can work wonderfully. Just ensure they aren’t too thick.
* **Wrapping Paper:** You can sometimes find decorative wrapping paper that’s thin enough to fold nicely. Be mindful of any very thick or glossy coatings.
* **Colour:**
* **Solid Colours:** Use different coloured papers for a whole furniture set. Imagine a red sofa next to a blue armchair!
* **Two-Tone Effects:** If you use single-sided paper with a distinct white backing, you can intentionally fold in ways that expose the white to create interesting accents or details.
Displaying and Gifting Your Origami Sofa
Your finished origami sofa isn’t just a folding exercise; it’s a little piece of art!
* **Dioramas and Dollhouses:** These tiny sofas are perfect for adding to miniature scenes. They look fantastic on a small table in a dollhouse or as part of a larger diorama.
* **Desk Decoration:** Place your origami sofa on your desk or bookshelf as a cheerful reminder of your crafting skills. It can be a great conversation starter.
* **Gift Topper:** Instead of a traditional bow, why not use a tiny origami sofa to adorn a gift? It adds a unique and personal touch.
* **Party Favors:** Fold a batch of tiny sofas in fun colours and use them as charming party favors for guests.
* **Gift It As Is:** A single, beautifully folded origami sofa made from special paper can be a lovely, thoughtful gift on its own. Package it in a small clear box or a little cellophane bag with a ribbon.
I hope you’ve enjoyed learning how to fold this charming origami sofa. Remember to be patient with yourself, take your time, and most importantly, have fun with the process! Happy folding!
Conclusion
Congratulations on folding your very own origami sofa! We hope you enjoyed this fun and rewarding paper craft. Don’t worry if your first attempt isn’t perfect – every fold is a learning experience, and practice makes progress. We’d love to see your finished creation! Feel free to share your delightful sofa with friends and family. Ready for more paper adventures? Try folding a miniature origami armchair or perhaps a cozy origami ottoman next. Keep exploring the wonderful world of paper folding; there are endless possibilities for creativity!